Monday, March 11, 2013

Lemon Garlic Shrimp & White Cheese Pizza (plus a bonus)!

Last weekend, my 14 year old brother held a sleepover at our house. This meant that I was in charge of feeding 10 hungry teenagers...who are mainly taller than me. I needed to create something that would be filling and could be done in bulk. So in addition to the pizzas, they had Rotel Dip and Italian Meatballs. I will warn you and let you know that due to the types of cheeses I used, it can get pricey. But a lot them can also be found outside of the deli and in the dairy aisle of your local grocery store. Additionally, due to the time constraints, I didn't have time to make anyone's dough from scratch. Thank you Pillsbury! The first recipe is everything listed in the ingredients sans the colored peppers, broccoli, shredded Mozzarella and cilantro. The second one includes everything. I hope that you enjoy!!!

Ingredients:

  • 2 cans of whole wheat pizza crust. (I chose to use Pillsbury's brand, but I've heard that Trader Joe's has some awesome ones as well.)
  • fresh spinach
  • lemon juice
  • garlic evoo
  • mushrooms
  • parsley
  • cilantro
  • basil
  • 1 1/2lbs of jumbo deveined shrimp
  • red onion
  • red and orange bell peppers
  • broccoli 
  • crumbled Feta cheese
  • shredded Asiago cheese
  • shredded Parmasan cheese
  • shredded Mozzarella cheese
  • shredded Romano cheese 

After cleaning and removing the tails from your shrimp, cut them into quarter of an inch pieces. In a mixing bowl, add 3tbsp on lemon juice, 3tbsp of garlic evoo and freshly cracked black pepper. Mix evenly and sit in the refrigerator as you prepare your veggies. Cut about about 1/2 of your red onion Julienne style. Wipe your mushrooms off with a damp paper towel, remove the core and slice evenly. Also, I like pizza FULL of toppings. So I used the entire package of mushrooms, half of each bell pepper and the entire bag of spinach while making these two pizzas. Preheat your oven to 400 degrees. Lightly grease your baking pan with a non-stick spray and roll your dough out. Once in the pan, rub garlic evoo on your dough and place in the oven. Depending on how you like your crust, will determine how long you initially leave your crust in the oven. I like my crust on the softer side, so I left it in for 5 min. While your dough is browning, cook your shrimp. Since they're already seasoned, spray your skillet with a non-stick spray and cook on medium to high. Once they are pink, they're done. 

Remove your crust from the oven and top with toppings! Add a hefty bed of spinach, then your onions and mushrooms, then your shrimp, then all of your cheeses. Lastly, top with parsley and basil. Bake for an additional 10min and you're ready!


Now for the next pizza, you'll almost do the same thing as the first one. Except, in a mixing bowl, add a 1/2cup of each bell pepper (chopped), 1 cup of sliced mushrooms, 1 cup of red onions, 2 cups of broccoli and 2tbsp of evoo. Mix evenly. After browning your dough, add all of your toppings, shrimp, all the cheeses mentioned in the ingredients section, parsley, basil and cilantro.
Bake for 12 min on 400 degrees. Remove from oven and let stand for 3min. 


Slice and serve!

Wednesday, March 6, 2013

Garlic Olive Oil!

Whenever I can, use garlic and/or EVOO in my foods. Not only do they enhance your foods, but they're really healthy for you. EVOO is much better for you than regular cooking oil. Additionally, fresh garlic helps your body in fighting off sickness. Because garlic cloves can become tiresome when mincing by hand, I figured out a way to infuse the flavor of garlic into EVOO. It is not a long process at all and doesn't require much thinking! All you need to have handy is a 25fl.oz bottle of extra virgin olive oil, 2 garlic bulbs, a saucepan and a stove.

Open your garlic bulbs and peel. Then in a saucepan, pour the entire bottle of evoo on top of your cloves. Turn your heat to medium-high.


Allow the oil and cloves to come to a boil.


Once the cloves have charred, remove from heat and allow to cool. Discard of the charred cloves with a slotted spoon. And if you don't have a funnel, pour the oil into a measuring cup and pour back into the original bottle. Add the oil to your dishes and taste the difference!

Enjoy!

Saturday, March 2, 2013

DIY Jewelry Project!

I did this post for my Spelman Sisters over at TheHighLifeSuite and wanted to share with my readers as well. I'll be adding more DIY projects on here...I don't only cook ;) Enjoy <3!
whit

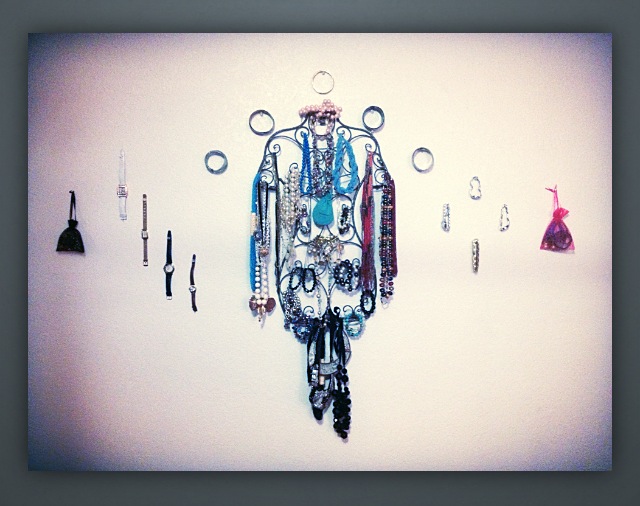
Recently, I had to call a truce with my jewelry and my dresser…SOMETHING HAD TO GIVE! Outside of my expensive pieces like my authentic pearls and diamonds, all of my everyday jewelry was always thrown about on my dresser. Well, I have had enough! I pulled all of my pieces from dresser and stared at the them for a long time.
whit0
I was going to go out and thrift for something to hang all my jewelry on when I looked up and saw I already had this bare lady on my wall!The only additional thing I had to buy were clear push pins.I also had these small jewelry bags which were leftover from beads I’d ordered from the beaded jewelry line, Kill Pink before they went under to revamp. The bags came in handy for those jewelry items that couldn’t be secured using the push pins.Since you most likely won’t have these things readily available to you, I suggest going to your local Goodwill, Salvation Army or any other great thrifting spot to find your centerpiece to hang your jewelry. Though I hung all of this without a ruler, I’d suggest that you use one to be on the safe side.


whit1
Once you’ve found your centerpiece, grab your clear push pins, your ruler, mini mesh bags and you’re ready to go!


whit4 

When placing my jewelry on my centerpiece, there was no rhyme nor reason. I hung pieces as I was led. I put all of my beads and necklaces on the centerpiece because I knew I wanted my watches and African bracelets to appear as if they were floating.  Once I finished hanging my pieces, I grabbed my push pins to hang my watches and wooden bracelets. I placed each pin inside of the the first hole of each watch with about an inch and a half apart and 3 inches below each other. Of course, this is all dependent on the types and amount of watches & bracelets you have. So feel free to do what works best for you! Inside of my bags, I put my pins, rings and earrings to create easy access.  To hang my bracelets and watches, I placed them on the wall and then put the push pin inside to secure placement.
whit2


whit3

Once you've finished, you have a beautiful, yet easy access, to your jewelry!

whit5

Friday, March 1, 2013

Cheesy Mashed Potatoes!

As most of you know, I don't get my culinary skills from my mom...bless her heart! She wanted potatoes to go with her chicken & started to make instant potatoes. I had to put my foot down! These homemade cheesy mashed potatoes took about 30 min to make, from prep to completion. 

Ingredients (serving size: 4)

  • 2 large white potatoes 
  • 4 medium red potatoes
  • salt
  • pepper
  • parsley
  • chives
  • milk
  • butter
  • shredded mozarella & colby cheese
  • garlic powder

Instructions: Boil 2 quarts of water in a large pot. Peel the white potatoes completely, unlike the red potatoes. Rinse the potatoes to remove any dirt that may have been left. Cut the potatoes into 1/2 inch slices.  Once the water has reached a boiling point, add the potatoes and cook uncovered on high for 15min. Once done, drain all water from the potatoes. MIX INGREDIENTS IN THE POT...THE HEAT HELPS TO MELT EVERYTHING! In your pot, then add 3tbsp of butter & 1/2 cup of milk. Season with salt, pepper, parsley and cheese to your taste. Use a whisk to mash the potatoes in your pot. Once you've reached your desired taste, top with chives and serve your side dish!


Stuffed Peppers with Ground Turkey and Shrimp!

I have been craving stuffed peppers for the LONGEST! But I knew I wanted to add a twist to mine. Most traditional stuffed peppers call for ground beef and ground pork. However, I'm not a huge beef nor pork eater. So after some brainstorming, I took a chance on a recipe I concocted while in the grocery store. AND GOOD GAWD was it AMAZING?!

Ingredients:
  • turkey sausage
  • cherry tomatoes
  • green onion
  • yellow onion
  • white mushrooms
  • heavy whipping cream
  • multi color bell peppers
  • 1/2lb raw shrimp, deveined
  • jasmine rice
  • shredded parmesan cheese
  • garlic cloves
  • evoo
  • salt
  • pepper
  • cayenne pepper


In a large pot, boil 6qts of water. While the water is beginning to boil, remove the tops from your peppers, slice in half and remove seeds. Rinse your peppers to remove any excess seeds and dirt. By the time you finish, your water should be boiling. Depending on the size of your pot, add 5-6 halves at a time. Allow them to boil for 4min. Remove with a slotted spoon and allow them to dry on a paper towel facing down.

Next, it's time to prepare to cook your jasmine rice. In a saucepan, combine 2cups of water and 1tbsp on evoo. Once it's reached its boiling point, add 3/4cup of rice. Reduce your heat from high to low and cover with lid, occasionally stirring. Be sure to check on your rice! We don't want you to burn anything. 

Next it's time chop your veggies. Hopefully you have a chopper. It really makes this much easier. In your chopper, add 1/2cup tomatoes, 6 mushrooms, and 2 garlic cloves. Chop for about 5-7sec and sat aside. Seperately chop 1/4 cup of yellow onion. Then remove the tails and legs from your shrimp and rinse. Once they're done,  cut in half and add them in a mixing bowl with your tomatoes, mushrooms, garlic, salt, black pepper, cayenne pepper, 1/4cup of green onion, yellow onion and 3tbsp of evoo. Mix evenly. Then take two sausage links, remove the casing and add to your mixture as well. Heat your skillet and spray with a non-stick spray such as PAM. Once hot, add in everything from your mixing bowl. Cook thoroughly until both meats are done. When done, reduce your skillet to low and add 1cup of heavy whipping cream. Continue to cook until it begins to become less soupy, but not thick. By this point, your rice should be done as well. Remove both from heat and add all ingredients into a mixing bowl and stir evenly.

Preheat your oven to 350 degrees. In a baking dish, place your peppers face up and add about 1/8in of water. This prevents the shells from burning in the oven.


Begin to stuff your peppers and I mean STUFF them!


Bake for 15min, uncovered. Then top with shredded Parmesan and bake until cheese is thoroughly melted. Once done, remove from oven and allow to sit for 10min. 


Remove from dish and dive in! Hope you enjoy!

Thursday, February 14, 2013

Sinful ChocoHazeBerry Cupcake!

**My friend and Spelman Sister DyannaLynn from The High Life Suite is today's guest contributor! She whipped up this special Valentine's Day dessert JUST for Cooking With Whitney B! I hope that you all enjoy it. I can't WAIT to try it :)**

Happy Valentine's Day everybody!

Nothing says Valentine's Day like desserts and more specifically chocolate! Today, I have a sinfully delicious chocolate cupcake with hazelnut filling and chocolate icing, topped with white chocolate strawberry. Think that's a mouthful? You haven't seen anything yet!

What you need:

For the cupcakes

  • 1 1/2 cups cake flour, sifted
  • 1 cup sugar
  • 1/2 tspn baking soda
  • 1/2 tspn baking powder
  • dash salt
  • 1 cup buttermilk
  • 1 stick of melted butter
  • 3 oz melted unsweetened chocolates
  • 2 eggs

Before starting, preheat your oven to 350 degrees.

Begin by combining your dry ingredients; the cake flour, sugar, baking soda, baking powder and the dash of salt. Set aside while you prep the remaining ingredients. I use a stand mixer, but you can also use a hand mixer and large mixing bowl. Add your melted butter, buttermilk tot he mixing bowl and mix on low. Turn the mixer up to medium and add in the 2 eggs. Now you can add in the melted unsweetened chocolate. Turn the mixer back to low and add in your dry ingredients; and allow the mixture to fully come together.


Prep your cupcake pans with liners and fill them 3/4 of the way full with the batter. Pop them in the oven and allow to cook for 18-20 minutes. Use a toothpick to test the center of the cupcakes in order to make sure they are done; the toothpick should come out clean when they are. Once they're done allow the cupcakes to fully cool before the next step.


I use a handy cupcake corer to remove a nickle sized plug from the cupcake(if you don't have one, don't worry, just use a sharp knife. Fill a plastic bag with your hazelnut spread of choice and snip the tip to form an opening just big enough to get a nice controlled flow. Fill each cupcake with a dollop of hazelnut spread.


For the Frosting


  • 1 stick of softened butter
  • 4 cups of powdered sugar
  • 1/2 cup sifted cocoa
  • 1/2 cup milk


Cream the stick of butter in the mixer, or with your hand mixer. Slowly add in the powdered sugar, then the cocoa, followed by the milk. The frosting should be nice and creamy but still have enough stiffness so that it won't run all over the place. If it seems to be too stiff, add a little more milk.


Now you're ready to frost! I use a piping bag and tip; however, it's just as easy to use a butter knife.


For the white chocolate dipped strawberries

  • 1 bag of vanilla candy melts
  • 1 carton of strawberries

Now it's time to top with the dipped strawberries. Wash and dry your strawberries and set aside. Melt the bag of candy melts using a small but deep pot on medium heat. Stir constantly to avoid sticking and/or burning. Slowly dip the strawberries in the melts and place on wax paper or non-stick foil. Place in the fridge until you're ready to top the cupcakes.


This recipe may sound like a lot, but I promise it's worth it! Once you try it, I promise you'll never buy a box cake or canned icing again :-) Happy baking! Remember to visit even more recipes as well as posts on fashion & DC living over at my blog, The High Life.
~ Dyanna

Wednesday, February 13, 2013

Chicken Stir-Fry!


In this hectic world we live in, every night cannot and will not be a "slave over the stove for hours" type of dinner. This meal was something that was thought of on a whim. My brother had a volleyball game which meant that we were going to get home late that evening. I had a bunch of errands that had to be run during the day and did not make it to the grocery store until after his game. I needed to cook something that wasn't going to take long and wasn't going to be too unhealthy since we were eating much later than normal. Because I knew what I was making beforehand, I was able to get in and out of the store in 15 minutes flat. The thing that held me up was deciding on using rice or noodles. Then I couldn't decide which type of noodle I wanted. I've heard about "glass noodles" before, but had never eaten then until this instance. Additionally, they were only 2 bucks, so it wasn't a big deal if they didn't work out. At any rate, it ended up being a success! I'll be using the noodles again!
Nom nom!


Ingredients:

  • skinless and boneless chicken tenderlions
  • steamable veggies
  • stir-fry sauce
  • saifun noodles (also known as fensi, chinese vermicelli, or glass noodles)
  • black pepper
  • crushed red pepper
  • evoo
  • slap ya mama or any type of cajun seasoning


Instructions:
In a large pot, bring 3 quarts of water to a boil. Once the water has reached its boiling point, remove from heat, add noodles, and cover with lid. The noodles soften as they sit in the hot water. While they are softening, wash and clean your chicken. Cut into bite-sized pieces and add to your pre-heated skillet. Add 2-4tbsps of evoo, depending on how much chicken you are cooking. With your skillet on medium heat, season your chicken with your peppers and cajun seasoning, if you have some. Once you start the chicken, place your bag of steamed veggies in the microwave. Brands differ with directions, so please be sure to follow your brand's directions accordingly. Once they have finished cooking, add your veggies to the skillet with your chicken, which should be done at this point. Lastly, add the stir-fry sauce. Poor as little or as much as you like. Some people like saucy foods...some don't. So you choose what you want! Cover and stir occasionally, on low, as the noodles finish cooking. 


Drain the water off the noodles. Make your base on your plate with them, then top with your chicken stir-fry. I totally get why the noodles are referred to as "glass noodles." They truly are see through and makes it appear as if your food is floating on your plate. Hope you enjoy! Be sure to comment!


This can also be made without meat and served as a vegetarian option!